
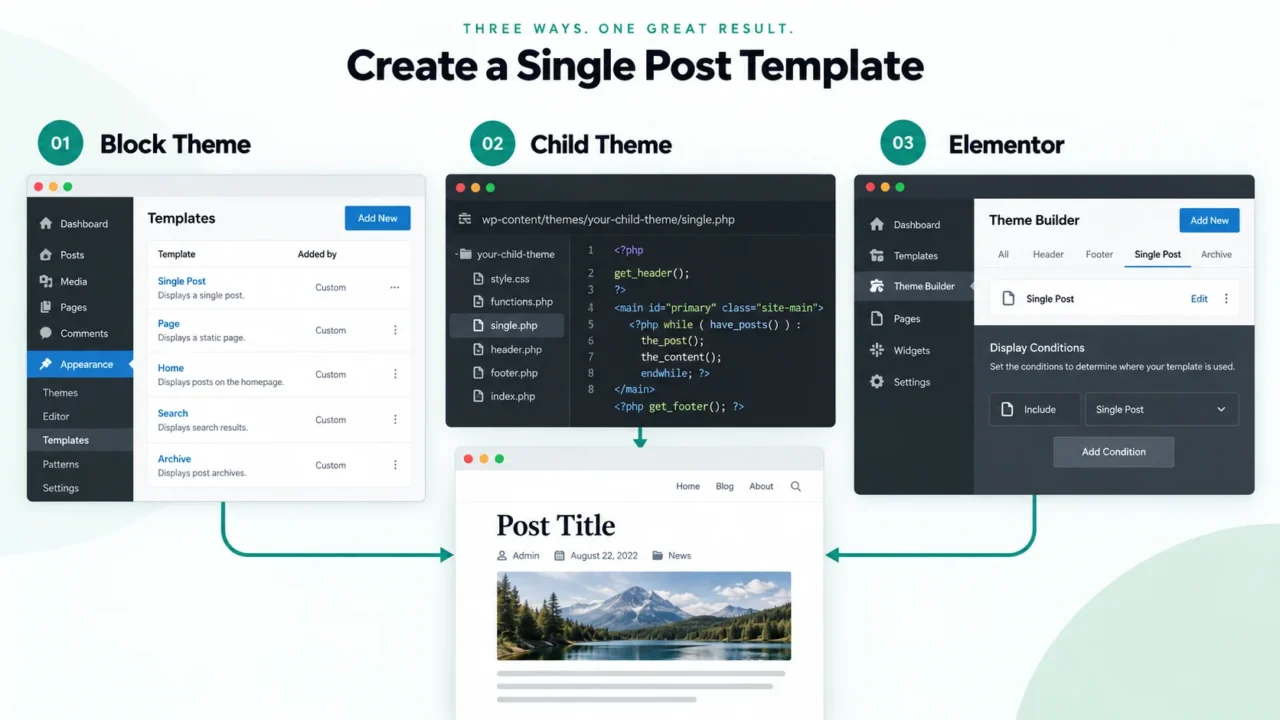
Quick answer: The right method depends on your setup. On a block theme, use the Site Editor or Template Editor to create or edit the Single Posts template with blocks. On a classic theme, create a child theme and add a single.php file that follows the WordPress template hierarchy. On Elementor, use Theme Builder to build a Single Post template and Pro’s Theme Builder to build a Single Post template with display conditions, which normally requires Elementor Pro.
If you’re still getting oriented to WordPress in general, what WordPress is used for is a good starting point before working through template-level changes like this one.
Who this guide is for, and what you need
This guide is written for site owners, marketing managers, and in-house developers who need every post on a WordPress site to share a consistent layout, and who are deciding how to build that layout. Before starting any of the three methods below, confirm you have:
- Administrator access to the WordPress dashboard.
- A recent, verified backup of the site’s files and database.
- A staging environment for any code-based change (the classic-theme and, ideally, the block-theme methods).
- Knowledge of your active theme type: block theme or classic theme. If you are not sure, go to Appearance > Themes; block themes generally expose a Site Editor link under Appearance, while classic themes typically show a Customize link instead.
- File access (SFTP or a file manager) if you are building a child theme.
- Elementor Pro, if Theme Builder is the method you choose. The Single Post template and header/footer templates covered here live inside Elementor’s Theme Builder, which requires Elementor Pro alongside the free Elementor plugin.
- A sample post you can safely use to preview changes before they go live.
Do not edit a live parent theme’s files directly, on any method. If a parent theme updates, direct edits to its files are overwritten and lost. The classic-theme method below uses a child theme specifically to avoid this.
Method-selection table
| Website setup | Recommended method | Skill level | Main advantage | Main risk |
| Block theme (Twenty Twenty-Five and similar) | Site Editor / Template Editor | Beginner to intermediate | No code required; changes are visual and reversible | A shared template change affects every post using it |
| Classic theme | Child theme with single.php | Intermediate to advanced | Full control over markup and logic | Requires PHP knowledge and careful testing |
| Elementor (with Elementor Pro) | Theme Builder Single Post template | Beginner to intermediate | Visual builder, works across most themes | Requires an active Elementor Pro subscription |
| Custom or heavily modified theme | Child theme, or a developer-led review of the existing template structure | Advanced | Preserves custom functionality already built into the theme | Higher chance of conflicts; professional review is often worth it |
What is a single post template?
A single post template is the layout wrapper around one blog post: the header, the post title and meta area, the content region, and the footer, arranged as a repeatable pattern. It is different from several related things that are easy to confuse:
- Individual post content is the text, images, and blocks you write inside a specific post. The template surrounds this content; it should not contain fixed article text of its own.
- A page template controls the layout for a page (the page post type), not a post. Pages and posts use separate parts of the template hierarchy.
- An archive or blog page lists multiple posts (a category page, a tag page, or the main blog index). A single post template controls one post at a time, not a list.
- A Query Loop or posts listing is a block or widget that pulls in and displays multiple posts, commonly used on archive pages or a custom “latest posts” section. It is a listing mechanism, not a single-post layout.
- A template part (in block themes) is a reusable chunk, such as a header or footer, that multiple templates can share.
- An Elementor Single Post template is Elementor’s version of the same concept: a Theme Builder template that supplies the surrounding design and pulls in dynamic post data for whichever posts match its display conditions.
In short: a single post template controls the surrounding layout and dynamic post elements (title, featured image, author, date, content area, and similar). It should not contain fixed content that is meant to appear identically, word for word, on every single post.
How WordPress chooses a single post template
WordPress does not simply have “one” single post template. It works through a hierarchy, trying more specific options first and falling back to more general ones. The exact hierarchy differs slightly by theme type.
In a block theme, according to the WordPress Developer template hierarchy documentation, a single post looks for matching templates in this order:
- A user-created custom template assigned to that specific post (stored in the database).
- single-{post_type}-{post_name}.html (a template for that exact post).
- single-{post_type}.html (a template for that post type generally, such as single-post.html).
- single.html
- singular.html
- index.html
Templates you create or edit in the Template Editor are stored as user-created templates, and these take priority over anything bundled with the theme itself. A child theme’s /templates folder also takes priority over the parent theme’s /templates folder.
In a classic theme, per the classic theme template hierarchy documentation, the same logic applies using PHP files instead of HTML:
- single-{post_type}-{slug}.php
- single-{post_type}.php
- single.php
- singular.php
- index.php
A child theme’s file of the same name overrides the parent theme’s file. If a child theme has a more specific file (for example single-product.php) and the parent theme only has a general one (single.php), the child theme’s more specific file wins, following the same specificity order as above.
Do not treat this as one universal rule that applies identically everywhere. Custom post types, attachment pages, and privacy policy pages each have their own, slightly different hierarchies, and the exact behavior depends on your active theme and any plugins that filter the template hierarchy.
Which method should you use?
- Block-theme users: Use the Site Editor’s Template Editor. It is built for exactly this task and needs no code.
- Classic-theme users: Use a child theme with a single.php file. This keeps your customization safe from theme updates.
- Elementor users: Use Theme Builder’s Single Post template, provided Elementor Pro is part of your setup. It gives you the same visual, no-code workflow you already use for pages.
- Developers building custom themes: A child theme, or a direct, carefully version-controlled change to the theme you maintain, is usually more appropriate than layering Elementor on top of a bespoke build. Weigh this against your theme’s own architecture.
- Not sure which setup you have: Check Appearance in your dashboard. A Site Editor link points to a block theme. A Customize link (without a full Site Editor) usually means a classic theme. If Elementor’s admin menu is present and posts are built with it, treat this as the Elementor method regardless of the underlying theme type.
Quick checklist before choosing:
- [ ] I know whether my theme is a block theme or a classic theme.
- [ ] I know whether Elementor and Elementor Pro are active on this site.
- [ ] I have a recent backup.
- [ ] I have staging access, or another safe way to test before publishing.
Method 1: Add a single post template with a block theme
This method uses the Site Editor, available on block themes, and needs no code.
- Back up the website. Confirm a current backup exists before making template changes.
- Confirm a block theme is active. Go to Appearance. If you see a Site Editor link, your theme supports this method, per the Template Editor documentation.
- Open the Site Editor. Go to Appearance > Editor.
- Open the Templates area. In the left-hand navigation, click Templates.
- Locate the Single Posts template. Click it in the list to preview it, then click the template (or the pencil icon) to edit it. If it doesn’t exist yet, click Add Template, choose Single item: Post, and confirm whether it should apply to all posts or a specific one.
- Add or arrange dynamic blocks. Build the layout using blocks such as Post Title, Featured Image, Post Author, Post Date, Post Categories, and Comments, alongside the essential Post Content block, which pulls in each individual post’s actual body text.
- Include the Post Content block. This is what makes the template dynamic. Without it, none of your posts will show their written content.
- Review global header and footer template parts. These are typically pulled in automatically; confirm they still display correctly with your new layout.
- Preview the template with a real test post. Use the sample post from your prerequisites list to check that dynamic fields populate correctly.
- Save only the intended changes, then click Save in the Site Editor.
- Test more than one post, including a post with a long title, one without a featured image, and one with several categories, to confirm the layout holds up.
- Test desktop and mobile layouts before considering the change complete.
Expected result: every post using this template (which, by default, is most or all posts, unless a specific post has its own custom template assigned) now displays with your new layout.
Important: because the Single Posts template is shared, changing it can affect every post that uses it, not just the one you were previewing. If you want a different layout for only one or two posts, create a separate custom template and assign it to just those posts instead of editing the shared Single Posts template.
Rollback: in the Site Editor, go to Templates, click the three-dot menu next to the Single Posts template, and select Reset. This restores the theme’s original default and discards your customization, so use it only if you’re certain, or after confirming you have a record of what you changed.
Method 2: Add a single post template with a classic theme and child theme
Classic themes use PHP template files rather than the Site Editor. Editing those files directly in the parent theme is unsafe, because a theme update will overwrite your changes. A child theme solves this by keeping your customization in a separate folder that the parent theme’s updates never touch.
- Create or activate a child theme. See the dedicated child theme section below for the minimum required structure.
- Confirm it loads correctly. Activate it under Appearance > Themes and check that the site still looks correct (a child theme without added styles should look identical to its parent).
- Identify the parent theme’s current single-post template. Check the parent theme’s folder for single.php, or singular.php if single.php doesn’t exist, following the classic theme template hierarchy.
- Copy the correct template into the child theme, when appropriate. If you’re making small changes, copying the parent’s file as a starting point can help; if you’re building a distinct layout, writing a new file is often cleaner.
- Use the correct file path. Place your file at the root of your child theme folder as single.php (for example, wp-content/themes/your-child-theme/single.php).
- Preserve required WordPress functions and hooks. Keep get_header(), get_footer(), and the post loop intact so the rest of the site’s structure still works.
- Modify the template carefully, changing one thing at a time where possible.
- Test on staging before touching the live site.
- Check multiple posts, responsive layouts, comments, metadata, navigation, and any plugin output (such as related-posts widgets or SEO plugin schema blocks) that might render inside the single post view.
- Deploy only after validation.
Example single.php for a child theme
<?php
/**
* Custom single post template for the child theme.
* Place this file at the root of the child theme folder as single.php.
* Tested against: WordPress Developer Theme Handbook, Post Template Files
* and Template Tags references (developer.wordpress.org).
*/
get_header(); ?>
<main id="site-content" class="single-post-content">
<?php
while ( have_posts() ) :
the_post();
?>
<article id="post-<?php the_ID(); ?>" <?php post_class( 'single-post-article' ); ?>>
<header class="single-post-header">
<?php the_title( '<h1 class="single-post-title">', '</h1>' ); ?>
<p class="single-post-meta">
<?php echo esc_html( get_the_date() ); ?> · <?php the_author(); ?>
</p>
</header>
<?php if ( has_post_thumbnail() ) : ?>
<div class="single-post-thumbnail">
<?php the_post_thumbnail( 'large' ); ?>
</div>
<?php endif; ?>
<div class="single-post-body">
<?php the_content(); ?>
</div>
<footer class="single-post-footer">
<?php the_category( ', ' ); ?>
</footer>
</article>
<?php
if ( comments_open() || get_comments_number() ) {
comments_template();
}
endwhile;
?>
</main>
<?php get_footer(); ?>
Where this goes: save as single.php inside your child theme's root folder.What each part does: get_header() and get_footer() pull in the site’s shared header and footer. The while ( have_posts() ) loop is WordPress’s standard post loop. the_title(), get_the_date(), the_author(), has_post_thumbnail(), the_post_thumbnail(), the_content(), and the_category() are documented WordPress template tags that output the current post’s dynamic data. comments_template() loads the theme’s comment form and list only if comments are open or already exist. All of these are standard, documented WordPress functions; none of them are custom or proprietary.
Expected result: any post using the Single template hierarchy (meaning it has no more specific override) now renders through this layout.
Limitation: this file will not affect a post that has a more specific template matching it higher in the hierarchy, such as a single-{post_type}.html block template, a plugin-registered custom post type template, or a template assigned directly to that post.
Rollback: deactivate the child theme and reactivate the parent theme, or simply remove or rename single.php inside the child theme folder; WordPress will fall back to the parent theme’s own template at the next matching hierarchy level. Confirm you have a backup of the child theme folder before removing files.
Do not edit WordPress core files under any circumstance, and do not make these changes directly in the parent theme’s files.
How to create a child theme in WordPress
A child theme is a small, separate theme that inherits everything from a parent theme while letting you safely override specific files, including single.php. Building one is how to create a child theme in WordPress without risking your customizations during a theme update, and it’s a required step for the classic-theme method above.
Minimum safe structure:
- Create a new folder inside wp-content/themes/, for example wp-content/themes/business-child/.
- Inside that folder, create a style.css file with this header:
/**

 * Theme Name: Business Child

 * Template:   twentytwentyfour

 * Version:    1.0.0

 */
The Template field must exactly match the parent theme’s folder name, according to the WordPress Developer child themes documentation. If your parent theme’s folder is twentytwentyfour, that is the value to use.
- Load the child theme’s stylesheet, since WordPress does not always do this automatically. Create a functions.php file in the child theme folder with:
<?php

add_action( 'wp_enqueue_scripts', 'business_child_enqueue_styles' );

function business_child_enqueue_styles() {

    wp_enqueue_style(

        'business-child-style',

        get_stylesheet_uri(),

        array(),

        wp_get_theme()->get( 'Version' )

    );

}
Where this goes: functions.php at the root of the child theme folder.
What it does: wp_enqueue_style() is the standard, documented way to load a stylesheet in WordPress. get_stylesheet_uri() points to the child theme’s own style.css. This ensures your child theme’s styles actually load on the front end, since not every parent theme enqueues a child theme’s stylesheet automatically.
- Upload the child theme folder to wp-content/themes/ (via SFTP, a file manager, or as a ZIP through Appearance > Themes > Add New > Upload Theme).
- Activate it under Appearance > Themes.
Method 3: Create a Single Post template with Elementor
Elementor’s Theme Builder lets you design a Single Post template visually, without editing template files. Building and publishing Single Post templates through Theme Builder is a Theme Builder feature, which requires Elementor Pro in addition to the free Elementor plugin.
- Confirm your Elementor and Elementor Pro versions are current and compatible with your WordPress version before starting, per Elementor’s own system requirements.
- Open Theme Builder. From WP Admin, go to Templates > Theme Builder.
- Create a Single Post template. In the Theme Builder panel, click the plus sign on the Single Post card, as documented in Elementor’s Create a Single Post template guide.
- Start with a blank template or an appropriate library template. The Template Library opens automatically; choose an existing design or close it to start from scratch.
- Add dynamic widgets, including the essential Post Content widget, which pulls in each post’s actual written content.
- Add title, featured image, author, date, taxonomy, and comments when appropriate, using the Post Title, Featured Image, Post Info, and related dynamic widgets.
- Preview the template using a real post before publishing, to confirm dynamic fields populate as expected.
- Publish the template. Click Publish in the top right of the Elementor editor.
- Configure display conditions. When prompted, click Add Condition and choose where this template should apply (for example, all posts, or posts in a specific category).
- Test matching and nonmatching posts to confirm the template appears only where intended.
- Test desktop, tablet, and mobile layouts using Elementor’s responsive preview modes.
- Check for duplicate titles, content, headers, and metadata. A common mistake is adding a Post Title widget while the active theme also outputs its own title, producing two headings on the page.
- Save or export a rollback copy when supported, using Elementor’s template export feature, before making further changes later.
Expected result: posts matching your display conditions now render using this Elementor-designed layout, with dynamic post data filled in automatically.
Limitation: this method depends on an active Elementor Pro subscription. If that subscription lapses, published Theme Builder templates may stop functioning as designed, so this is a meaningful ongoing cost and dependency to weigh against the other two methods.
An Elementor Single Post template controls design and pulls dynamic post information; fixed article content should normally remain in the WordPress post editor itself, not hardcoded into the template.
Rollback: in Templates > Theme Builder, open the Single Post template, click Edit Conditions, and remove or adjust the condition so it no longer applies, or delete the template entirely from the Theme Builder list if you want to fully revert to the theme’s default single post output.
How to hide header in Elementor WordPress
This section covers hiding a header only as it relates to a single post template; it is not a complete header customization guide.
There are a few different things people mean by “hiding the header,” and they carry different levels of risk:
- Hiding a global header on selected content. The safest approach is to leave your main Header template untouched and instead adjust that Single Post template’s display, or exclude specific content from the header’s own conditions.
- Changing header display conditions. In Templates > Theme Builder, open your Header, click Edit Conditions, and add an Exclude condition for the specific post or post type where you don’t want the header to show. This is reversible: removing the exclusion brings the header back immediately.
- Using an appropriate Elementor page layout. When editing a post with Elementor, the Page Settings panel offers layout options; certain layouts remove the theme’s header, footer, and sidebar for that specific piece of content without touching the shared Header template at all. This is often the simplest, lowest-risk option for a single post that genuinely needs no header.
- Accidentally removing a header sitewide. This typically happens when someone deletes the Header template itself, rather than adjusting its conditions, or sets an exclusion condition that unintentionally matches every post instead of just one. Always adjust conditions rather than deleting templates, and confirm the affected scope before saving.
Removing a header is not a decision to make lightly. A header usually carries primary navigation, branding, and often a path back to other important pages or a contact method. Removing it from a page can hurt a visitor’s ability to navigate the site, weaken brand recognition, and reduce the chances a reader takes the next step you want them to take. Reserve this for cases with a clear, deliberate reason, such as a distraction-free landing page, rather than doing it by default on ordinary blog posts.
How to add a post to a page in WordPress
This is a different task from creating a single post template, and it’s worth being clear about the difference before you build anything.
A single post template controls the layout of one individual post when a visitor opens it directly. Adding posts to a page is about displaying a list of multiple posts together, and there are a few common ways to do it:
- Assign a page as the Posts Page. Under Settings > Reading, you can designate a specific page as your site’s posts listing, separate from the homepage.
- Use a Query Loop block inside the block editor to display a chosen set of posts (by category, tag, or other criteria) directly within any page’s content.
- Use an Elementor Posts, Archive Posts, or Loop Grid widget, where available, to display selected posts in a custom layout on any Elementor-built page.
Essential elements of a good single post template
There is no single universal design that fits every site, but most effective single post templates include some combination of the following, used deliberately rather than by default:
- One clear H1, almost always the post title, and only one per page.
- Post title, prominently placed near the top.
- Featured image, when the content type benefits from one.
- Author, particularly relevant for multi-author sites or where expertise matters to the reader.
- Publication or modification date, which helps readers judge how current the content is.
- Post content, the actual body text, always present via the Post Content block or widget.
- Categories or tags, when they help readers find related material.
- Readable content width, generally a constrained line length rather than full browser width, for comfortable reading.
- Table of contents, useful for long-form or highly structured posts, not necessary for short ones.
- Previous and next post navigation, helpful for sequential content or blogs readers browse in order.
- Related content, when you have a mechanism to surface it accurately rather than arbitrarily.
- Comments, when enabled and moderated.
- CTA placement, positioned where it fits the reader’s likely intent rather than interrupting the content awkwardly.
- Mobile readability, tested directly rather than assumed from the desktop view.
- Accessibility, including heading order, sufficient color contrast, and keyboard-navigable interactive elements.
- Performance, since a template with too many widgets, scripts, or unoptimized images can slow down every single post that uses it.
- Schema consistency, so that structured data (from a theme, plugin, or manual markup) matches what the template actually displays.
Which of these matter most depends on your content type, audience, and goals. A recipe blog and a B2B services blog will reasonably prioritize different elements from this list.
Testing checklist
Before considering any of the three methods complete, confirm:
- [ ] The correct template is applied to the intended posts.
- [ ] Correct posts are included under the template’s scope or conditions.
- [ ] Incorrect posts are correctly excluded.
- [ ] Post content is visible and renders correctly.
- [ ] No duplicate title appears.
- [ ] No duplicate featured image appears.
- [ ] Header and footer display correctly (or are intentionally absent, per your design).
- [ ] Author and date display correctly.
- [ ] Categories and tags display correctly.
- [ ] Comments behave correctly, including the comment form when enabled.
- [ ] Plugin output (SEO schema blocks, related posts, social sharing, and similar) still renders correctly.
- [ ] Desktop layout is correct.
- [ ] Tablet layout is correct.
- [ ] Mobile layout is correct.
- [ ] Keyboard navigation works through interactive elements.
- [ ] Heading order is logical (one H1, followed by properly nested H2s and below).
- [ ] Structured data, if present, matches the visible content.
- [ ] Page speed has not visibly regressed.
- [ ] Cache has been cleared after publishing changes.
- [ ] The page looks correct both logged in and logged out, since some plugins or admin bars can affect logged-in views.
Rollback instructions
Block-theme template changes: In the Site Editor, go to Templates, open the three-dot menu next to the Single Posts template (or the specific custom template you edited), and select Reset to restore the theme’s default. This discards your customization, so confirm you have notes or a backup of your prior configuration if you might want it again.
Child-theme file changes: Remove or rename the modified file (for example, single.php) inside the child theme folder, or deactivate the child theme and reactivate the parent theme. Always confirm a backup of the child theme folder exists before deleting anything, and never delete a file without knowing what it contains.
Elementor templates and display conditions: In Templates > Theme Builder, open the relevant template, click Edit Conditions, and remove or adjust the condition so the template no longer applies where you don’t want it. To fully remove a template, delete it from the Theme Builder list; consider exporting it first if Elementor’s export feature is available, so you can restore it later if needed.
Every rollback path above returns the site to a previous, known-working state without requiring a full site restore, provided you have not also deleted your backups.
Troubleshooting
| Symptom | Likely cause | Safe check | Recommended fix |
| Template does not appear | Wrong theme type assumed, or template not assigned | Confirm block theme vs. classic theme; check template assignment or Elementor conditions | Reassign the template, or switch to the correct method for your setup |
| Changes affect every post, not just one | Editing the shared Single Posts template instead of a post-specific template | Check which template is currently assigned to the affected posts | Create a separate custom template for posts that need a different layout |
| Post content is missing | Post Content block or widget not included in the template | Open the template and confirm a Post Content block/widget is present | Add the Post Content block (block theme) or widget (Elementor) |
| Duplicate title appears | Both the theme and a custom template output the title | Preview the post and check for two identical headings | Remove the Post Title block/widget from the template, or disable the theme’s default title output |
| Header or footer disappears | Template part removed, or an Elementor condition unintentionally excludes it | Check the template’s structure or the header’s Theme Builder conditions | Re-add the missing template part, or correct the exclusion condition |
| Elementor template does not apply | Conditions not published, or a more specific condition elsewhere takes priority | Review Edit Conditions for conflicting rules | Adjust or remove the conflicting condition, then republish |
| Wrong display conditions | Condition scope set too broadly or too narrowly | Test with both a matching and a nonmatching post | Edit the condition to match only the intended posts or post type |
| PHP error after editing | Syntax error in a child theme template file | Check the site’s error log, or use a staging copy to isolate the change | Revert the file to the last known-working version and reintroduce changes incrementally |
| Styling differs between editor and front end | Editor preview styles not matching the live theme’s CSS | Compare the published page directly, not just the editor preview | Adjust CSS in the appropriate theme or Additional CSS location, not inline |
| Cache shows an older template | Page or object cache serving a stale version | Check whether a caching plugin or host-level cache is active | Clear the relevant cache after every template change |
| Mobile layout breaks | Fixed widths or unresponsive blocks/widgets in the template | Preview at multiple breakpoints, not just one mobile size | Adjust spacing and widths using responsive controls rather than fixed pixel values |
| Plugin content disappears | Plugin hook not called in a custom template file | Compare the custom template against the original for missing hooks or function calls | Reinstate the specific hook or function the plugin depends on |
If your team needs hands-on help choosing between these methods, or building and testing a template properly on staging before it goes live, Vegestic’s web development services cover exactly this kind of WordPress development work. Request WordPress development to talk through your specific setup.
Frequently asked Questions (FAQ's)
What is a Single Post template in WordPress?
A Single Post template is the layout that surrounds an individual blog post, including its title, meta information, content area, and often related elements like categories or comments. It controls how one post displays, not the post's actual written content, and not a list of multiple posts.
Can I create a Single Post template without coding?
Yes. On a block theme, the Site Editor's Template Editor is entirely visual. With Elementor Pro, Theme Builder is also entirely visual. Coding is only required for the classic-theme child-theme method described in this guide.
Do I need a child theme to edit single.php?
Yes, if you want your changes to survive theme updates. Editing single.php directly inside a parent theme works until the next update, which will overwrite the file and remove your changes. A child theme keeps your version separate and safe.
Does Elementor Theme Builder require Elementor Pro?
Yes. Theme Builder, including Single Post templates and header or footer templates, is part of Elementor Pro rather than the free Elementor plugin. Confirm your current plan before starting this method.
Why is my Elementor Single Post template not displaying?
The most common causes are a display condition that doesn't match the post you're viewing, a condition that was never published, or a more specific condition elsewhere taking priority. Review the template's Edit Conditions panel and test against both a matching and a nonmatching post.
How do I apply a template to only one category or post type?
In the block theme Template Editor, create a template scoped to that specific post type or category rather than editing the general Single Posts template. In Elementor, use the Theme Builder's Add Condition option to scope the template to a specific category, post type, or individual post.
Will changing the Single Post template affect existing posts?
Yes, for any post that uses that template. Because the Single Posts template is typically shared across most or all posts, a change to it applies retroactively to every post that doesn't have a more specific override.
How do I restore the original template?
On a block theme, use the Reset option in the Site Editor's Templates list. On a classic theme, remove or rename the child theme's template file, or deactivate the child theme. In Elementor, edit or remove the template's display conditions, or delete the template from Theme Builder.
Is adding a post to a page the same as creating a Single Post template?
No. Adding posts to a page means displaying a list of multiple posts together, typically through a Posts Page setting, a Query Loop block, or an Elementor posts widget. A Single Post template controls the layout of one individual post at a time.
How can I hide the header on selected Elementor posts?
The safest approach is to add an Exclude condition to your Header template in Theme Builder for the specific post or post type, or to use an Elementor page layout option that removes the header for that content without touching the shared Header template. Avoid deleting the Header template itself, since that removes it sitewide.
Last updated September 23, 2026