
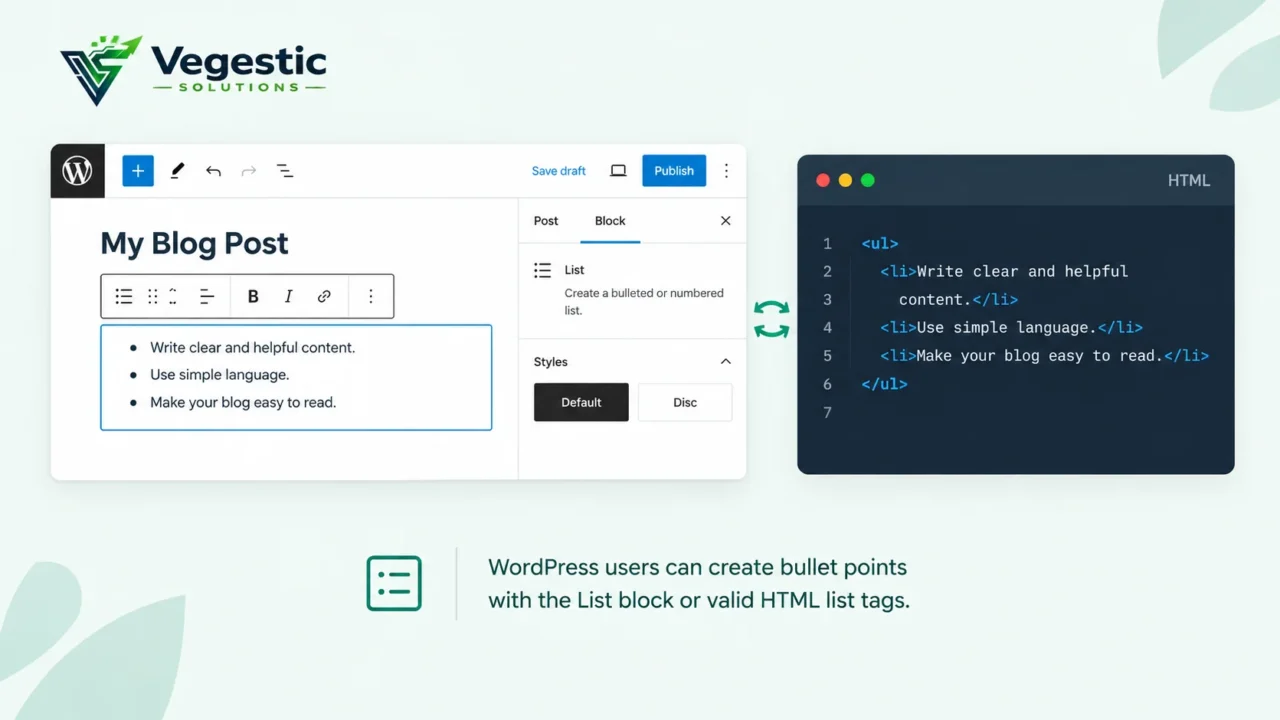
Quick answer: To add bullet points in WordPress, open the block editor, click the block inserter (the + icon), search for List, and press Enter to insert it. Type your first item, then press Enter after each line to add more bullets. Use the toolbar’s Unordered List icon for bullets, or the Ordered List icon for numbers, and press Tab to indent an item into a nested list.
If you are new to WordPress in general, our guide on what WordPress is used for covers the basics before you get into formatting content inside it. If you already know your way around the dashboard, skip straight to the steps below.
Add a List block in the WordPress block editor
- Open the page or post you want to edit, or start a new one.
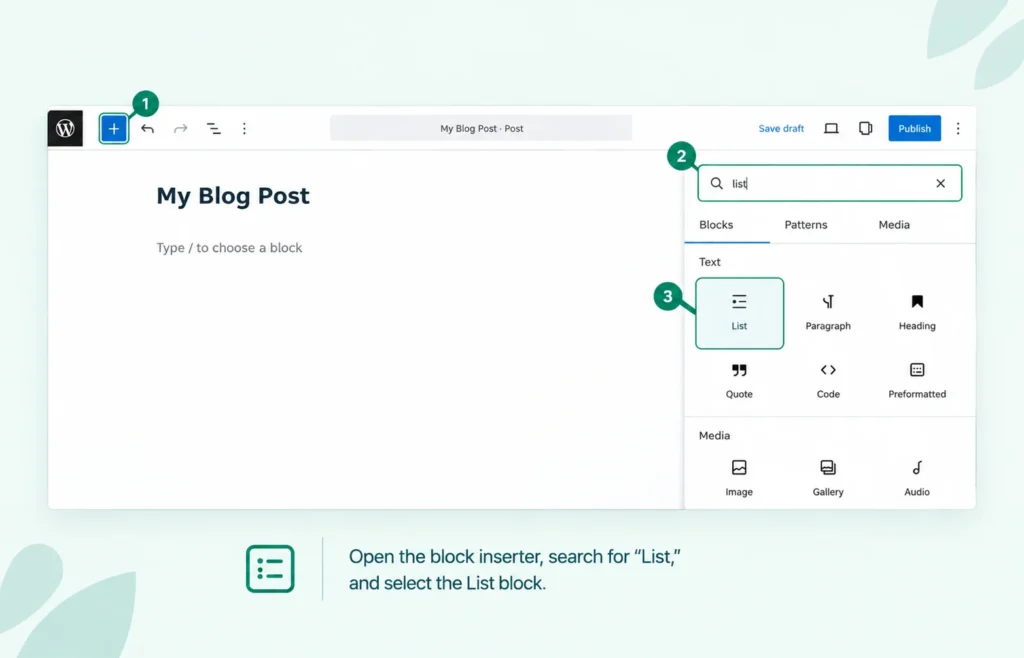
- Click the + Block Inserter icon in the top toolbar (or click the + that appears between blocks in the content area).
- Type “List” into the search field and select the List block. You can also type /list directly in a new line and press Enter, which inserts the block without opening the full inserter.
- Type your first list item.
- Press Enter to start a new line. WordPress automatically creates a new bullet for each line you add.
Expected result: each line you type becomes its own bullet point, indented under a single List block, with a round bullet character shown by default.
Turn a bulleted list into a numbered list
- Click anywhere inside the List block you want to change.
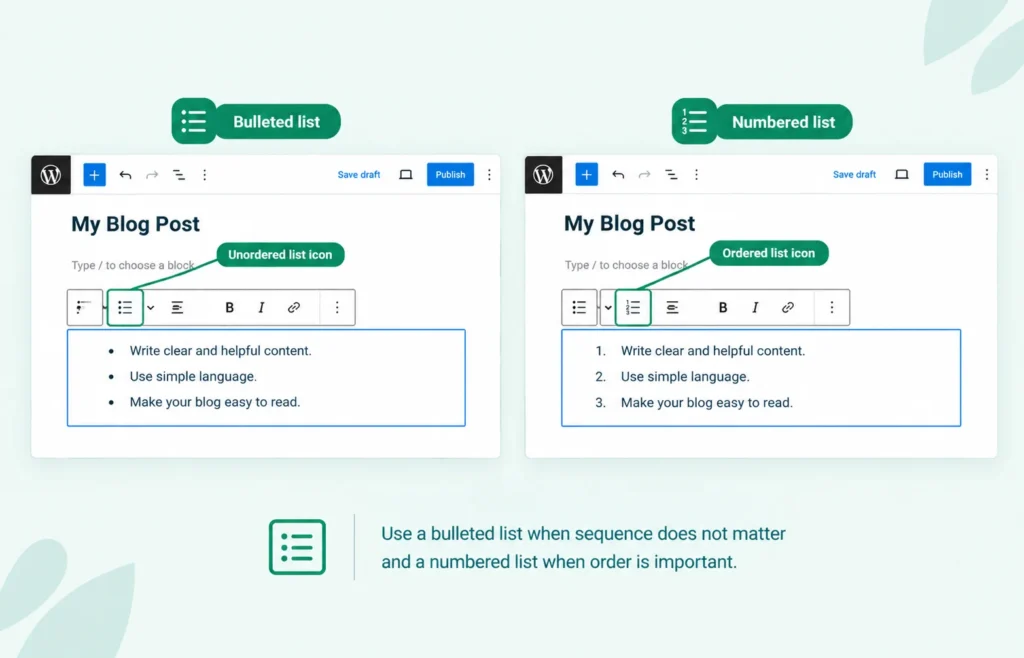
- In the block toolbar that appears above the list, click the Ordered List icon (it looks like stacked lines with “1 2 3” next to them).
- Your bullets convert to numbers immediately, without changing the text.
To switch back, click the Unordered List icon in the same toolbar.
For more control over an ordered list, open the block Settings panel in the right-hand sidebar (click the gear icon if the sidebar is hidden). With an ordered list selected, you will see:
- List Style: to choose how numbers are displayed (for example, decimal, or lettered).
- Start value: to begin the list at a number other than 1.
- Reverse order: to count down instead of up.
Expected result: the same list items, now numbered instead of bulleted, with the numbering options available in the sidebar.
Create a nested list
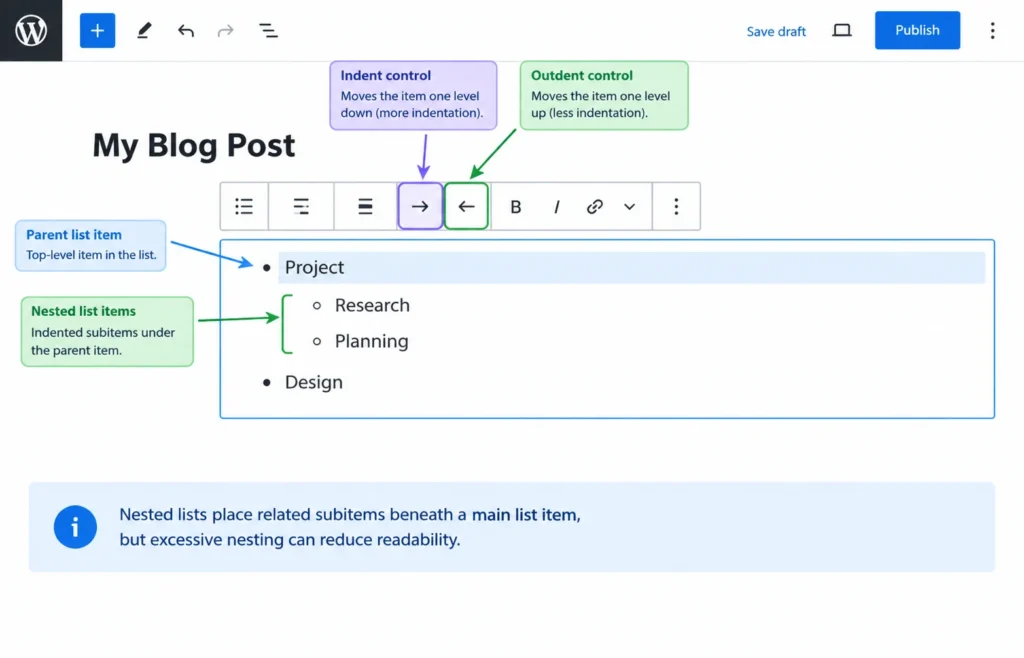
A nested list is a list inside a list, useful for grouping related sub-points under a main item.
- Click at the start of the list item you want to nest under the item above it.
- Press Tab, or click the Indent list item option in the block toolbar. The item moves in and becomes a sub-item of the line above it.
- To move it back out, press Shift+Tab, or use the Outdent list item toolbar option. Pressing Backspace at the very start of an indented item also outdents it.
- Repeat for as many items as you need. You can nest more than one level, though two levels are usually enough for a blog post to stay readable.
Expected result: the indented items appear visually offset under their parent item, and the underlying HTML wraps them in their own nested <ul> or <ol>.
Add, remove, and rearrange list items
Add an item: click at the end of any list item and press Enter. A new bullet or number appears on the next line.
Remove an item: select all the text in the item and delete it, then press Backspace once more. The empty line is removed and the list closes up around it. If it is the last item in the list, pressing Backspace on an empty item exits the list entirely, letting you continue in a new paragraph block.
Rearrange items:
- Click a list item, then use the up and down arrow icons in the block toolbar to move it one position at a time.
- Open List View (the icon with three horizontal lines in the top toolbar) to see every block on the page, including individual list items, and drag them into a new order.
Expected result: items appear, disappear, or change position exactly where you place them, without affecting the rest of the list’s formatting.
Add list HTML directly, for more control
Most blog lists do not need any HTML at all. The block editor’s List block, described above, produces valid <ul>, <ol>, and <li> markup on its own. Use one of the methods below only when you need something the List block’s own controls do not offer, such as a specific CSS class or markup pasted in from elsewhere.
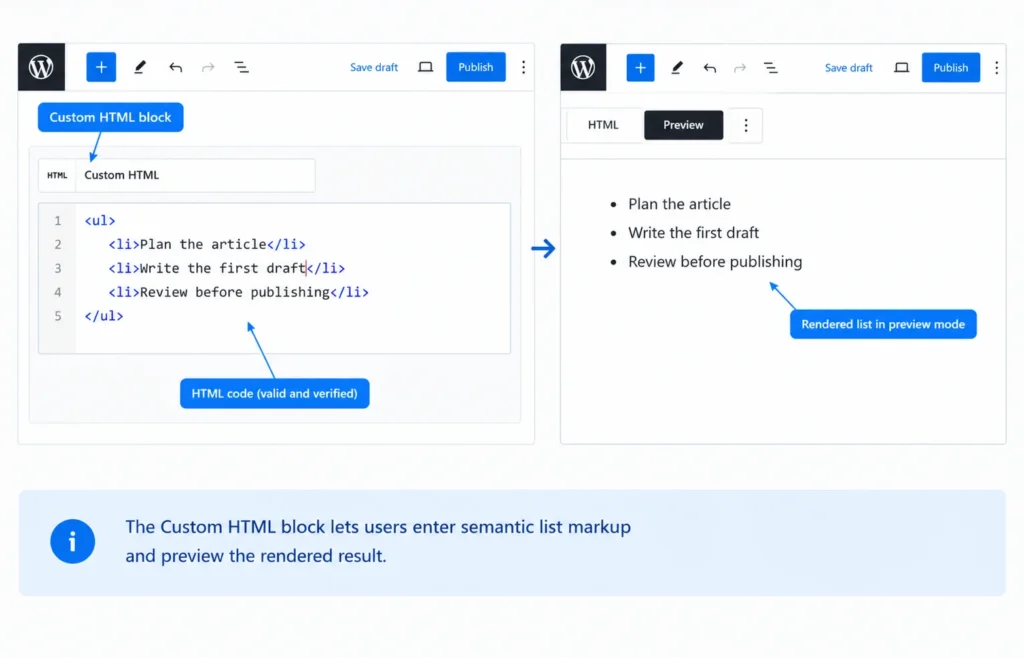
Use the Custom HTML block
The Custom HTML block lets you paste raw HTML directly into a post or page, including full list markup.
- Click the + Block Inserter icon and search for Custom HTML.
- Select the block to insert it.
- Type or paste your HTML directly into the block, for example a complete <ul> list.
- Click Preview inside the block to check that it renders correctly, or HTML to go back to editing the raw code.
- Publish or update the page as usual.
This is the most direct way to add an HTML tag to WordPress content that the visual editor does not already generate for you.
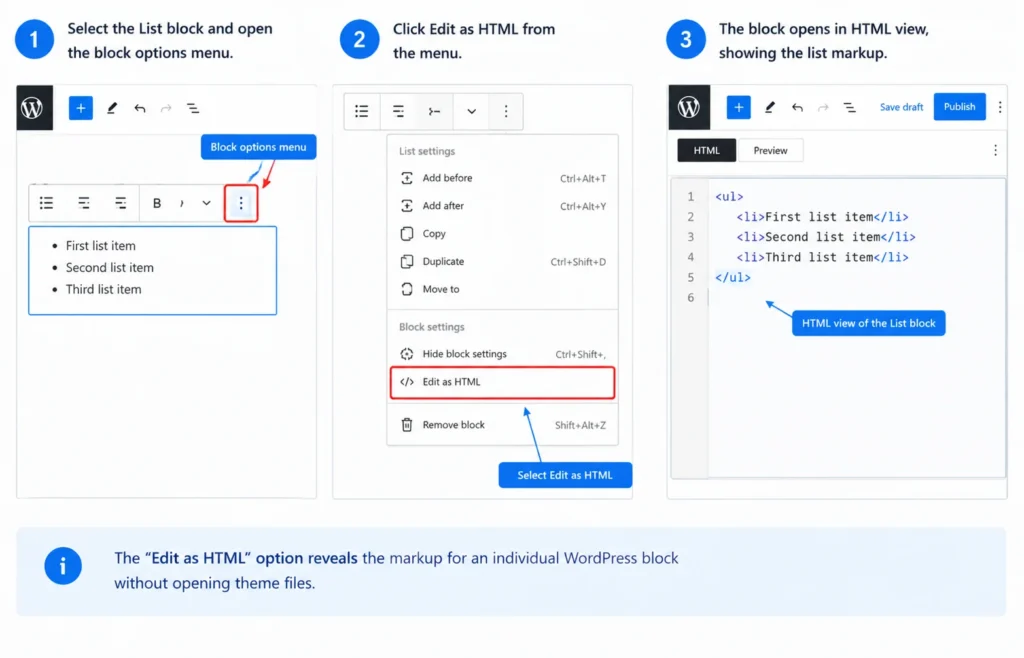
Edit an existing block as HTML
If you already have a List block on the page and want to tweak its underlying markup directly, rather than starting over with a Custom HTML block, you can edit that one block as HTML.
- Click the block you want to edit.
- Click the Options menu (three vertical dots) in the block toolbar.
- Select Edit as HTML.
- The block’s content switches to a plain HTML view. Make your changes directly in the code.
- To return to the normal visual view, open the same Options menu again and select Edit visually.
This is how to edit HTML in WordPress for a single block without affecting the rest of the page, and it is useful for small, precise changes, such as adding a class to one <li> or fixing markup pasted in from another source. It only changes the one block you have selected; it does not open a full page-level code editor.
Copy-ready list HTML
Use these examples as starting points. Paste them into a Custom HTML block, or into a block you are editing as HTML, and replace the placeholder text with your own.
Unordered (bulleted) list:
<ul>
<li>Fast onboarding for new team members</li>
<li>Clear service categories</li>
<li>A simple way to update pricing</li>
</ul>
Ordered (numbered) list:
<ol>
<li>Choose a domain and hosting plan</li>
<li>Install WordPress</li>
<li>Add your core pages</li>
</ol>
Nested list:
<ul>
<li>Content
<ul>
<li>Blog posts</li>
<li>Service pages</li>
</ul>
</li>
<li>Design
<ul>
<li>Homepage layout</li>
<li>Color palette</li>
</ul>
</li>
</ul>
Each example above has been checked for valid, well-formed markup. Add them inside a Custom HTML block, or paste them into a block you have switched to “Edit as HTML,” and preview the result before publishing.
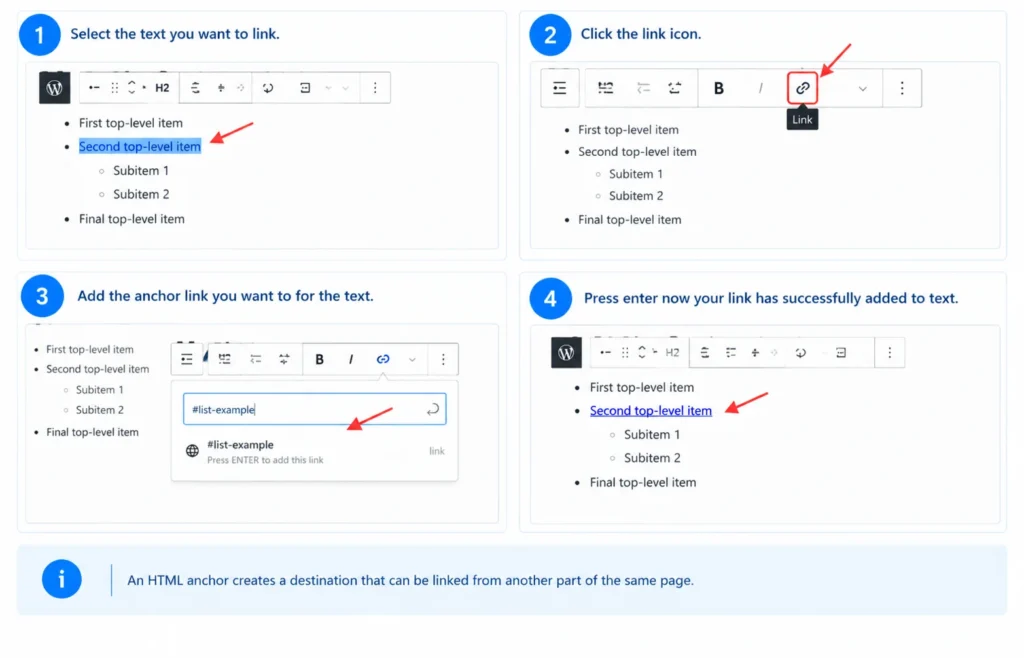
Link to a specific list with an HTML anchor
An HTML anchor lets you link directly to a specific list, or a specific item within a list, elsewhere on the same page. This is how to create an anchor link in WordPress without writing custom code.
- Click the List block you want to link to (or an individual list item, if you want to link to just that one line).
- Open the block Settings panel in the sidebar and expand Advanced.
- In the HTML Anchor field, type a short, unique identifier with no spaces, for example pickup-checklist. Do not include the # symbol here; WordPress adds it automatically when generating the link target.
- Elsewhere on the page, such as in a paragraph or button, add a link that points to # followed by the same identifier.
Example: if you set the List block’s HTML Anchor to pickup-checklist, the published markup looks like this:
<ul id=”pickup-checklist”>
<li>Confirm the pickup window with the customer</li>
<li>Check that all items are packed</li>
<li>Update the order status in the dashboard</li>
</ul>
A link elsewhere on the same page can then jump straight to it:
<a href=”#pickup-checklist”>Jump to the pickup day checklist</a>
Expected result: clicking the link scrolls the visitor straight to the list, without leaving the page. This is worth using on long posts with several lists, such as a step-by-step guide with a checklist near the bottom.
Style bullet points safely
The safest way to change how bullets look is through the block’s own settings, not by hand-editing your theme’s files.
- Styles tab: with a List block selected, open the Styles tab (the half-filled circle icon) in the sidebar. For unordered lists, this lets you choose an alternate bullet symbol, such as a checkmark, where your theme supports it.
- Color, Typography, Dimensions, and Border: the same sidebar offers controls for list color, font, spacing, and borders, without touching any code.
- A CSS class, for anything more specific: if you need a look the built-in styles do not offer, add a value in Advanced > Additional CSS Class(es), for example checklist, then define that class once in Appearance > Customize > Additional CSS (or your theme’s equivalent custom CSS area):
<ul class=”checklist”>
<li>Confirm the pickup window with the customer</li>
<li>Check that all items are packed</li>
</ul>
Avoid editing theme template files directly to change how lists look. A direct theme edit can be overwritten the next time the theme updates, and a small mistake in a template file can affect every page on the site. A CSS class combined with the Customizer’s Additional CSS panel, or a child theme if you are making more substantial changes, is safer and easier to undo.
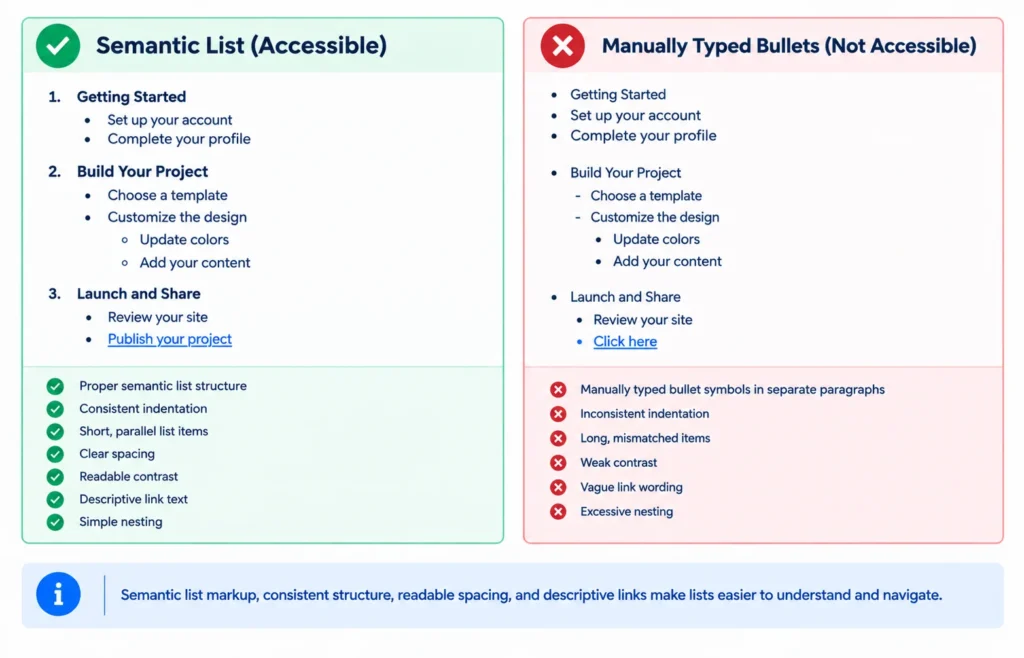
Why semantic lists matter for accessibility
A “list” that is really just several lines starting with a typed hyphen or asterisk looks like a list visually, but it is not one as far as a browser, a screen reader, or a search engine can tell. Using the actual List block, or valid <ul>, <ol>, and <li> markup, matters for several practical reasons:
- Use <ul> when order does not matter, such as a list of features or services.
- Use <ol> when sequence or priority matters, such as steps in a process.
- Use <li> for every item, rather than line breaks inside a single paragraph.
- Keep list items concise and in parallel grammatical form (for example, start every item with a verb, or every item with a noun, rather than mixing styles).
- Avoid unnecessary nesting. One or two levels is usually enough; deeply nested lists are harder to follow, especially with a screen reader.
- Maintain readable spacing and sufficient color contrast between list text, bullets or numbers, and the background.
- Use descriptive link text inside list items, rather than vague phrases such as “click here,” so the destination is clear out of context.
- Confirm links inside lists remain reachable by keyboard, using the Tab key, not just by mouse or touch.
None of this guarantees a particular ranking or accessibility score. It does mean assistive technology can correctly announce “list, three items” instead of reading disconnected lines of text, and that the structure of your content stays meaningful if the visual styling is removed or overridden.
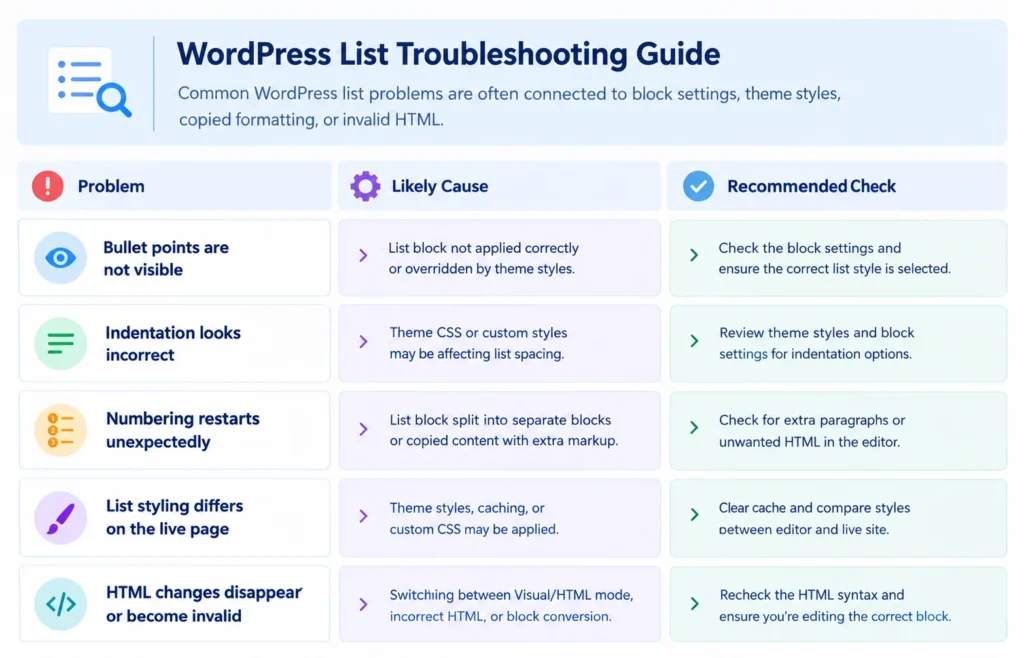
Troubleshooting common list problems
Bullets disappear after pasting from Word or Google Docs: Pasted content sometimes arrives as plain paragraphs with a typed bullet character rather than a real list. Delete the pasted lines and retype them inside a List block, or select the pasted text and use the block’s “Transform to” option in the toolbar to convert a paragraph into a list.
List items merge into a single line when pasted: This usually happens when the source content uses line breaks instead of separate paragraphs. Paste as plain text first (many browsers support a “paste without formatting” shortcut), then rebuild the list using the List block.
The bullet or number style does not change after selecting a new option: Some themes apply their own CSS to lists, which can override the block’s built-in style choices. Check your theme’s list styling, or apply a CSS class as described above and confirm the styling in Additional CSS.
Pressing Tab does not indent the item: Make sure your cursor is at the very start of the list item’s text before pressing Tab, or use the “Indent list item” button in the block toolbar instead of the keyboard shortcut.
An anchor link does not jump to the right spot: Check that the HTML Anchor value contains no spaces or special characters, and that the link’s href value matches it exactly, including capitalization, after the #.
A Custom HTML block shows raw code on the live page instead of a rendered list: This is almost always a markup issue, such as an unclosed tag or a stray character. Reopen the block, check that every <ul> or <ol> has a matching closing tag, and use the block’s Preview option before publishing again.
Using lists in the Classic Editor (legacy)
If your site still uses the Classic Editor rather than the block editor, the process is different and is described here separately so it is not mixed up with the block editor steps above.
- Place your cursor where you want the list, in the visual editing area.
- Click the Unordered list (bulleted) or Ordered list (numbered) icon in the Classic Editor’s toolbar.
- Type your first item and press Enter to add each additional item.
- Press Enter twice, or click the list icon again, to end the list and return to normal paragraph text.
To add or edit HTML directly in the Classic Editor, switch from the Visual tab to the Text tab above the editing area, then work with <ul>, <ol>, and <li> tags directly, using the same copy-ready examples provided earlier in this article.
If you would rather have someone else handle formatting, templates, or a full content build, Ask for WordPress help and Vegestic’s team can take it from here. For larger projects beyond individual content fixes, such as a new site or a redesign, see Vegestic’s web development services.
Frequently Asked Questions (FAQ's)
How do I add a bullet point in WordPress?
Open the block editor, insert a List block from the block inserter or by typing /list, then type your first item and press Enter to add more. Each new line becomes its own bullet point automatically.
How do I make a numbered list in WordPress?
Select your List block and click the Ordered List icon in the block toolbar. You can also start directly with an ordered list by choosing the numbered option when you first search for "List" in some editor versions, though converting after the fact works the same way.
Can I create a bulleted list without using the List block?
Yes, using a Custom HTML block with <ul> and <li> tags, or by selecting an existing block and choosing "Edit as HTML." The List block is the simpler option for most day-to-day publishing.
Why did my list lose its bullets after I pasted it in?
Pasted content from word processors often loses its list structure and becomes plain paragraphs with a typed bullet character. Retype the list inside a List block, or convert the pasted paragraph using the block's "Transform to" option.
Can I change what a bullet point looks like?
Yes, through the List block's Styles tab, which offers alternate bullet symbols depending on your theme, or through a custom CSS class applied in Additional CSS.
Can I link directly to one list on a long page?
Yes, by setting an HTML Anchor on the List block (or an individual list item) in the block's Advanced settings, then linking to that anchor with # followed by the same identifier elsewhere on the page.
Is it safe to edit HTML directly in WordPress?
Editing an individual block as HTML, or using a Custom HTML block, is generally safe for content-level changes such as lists, as long as the markup is valid and you preview it before publishing. Editing theme template files directly carries more risk and is not necessary for list formatting.
Last updated September 6, 2026